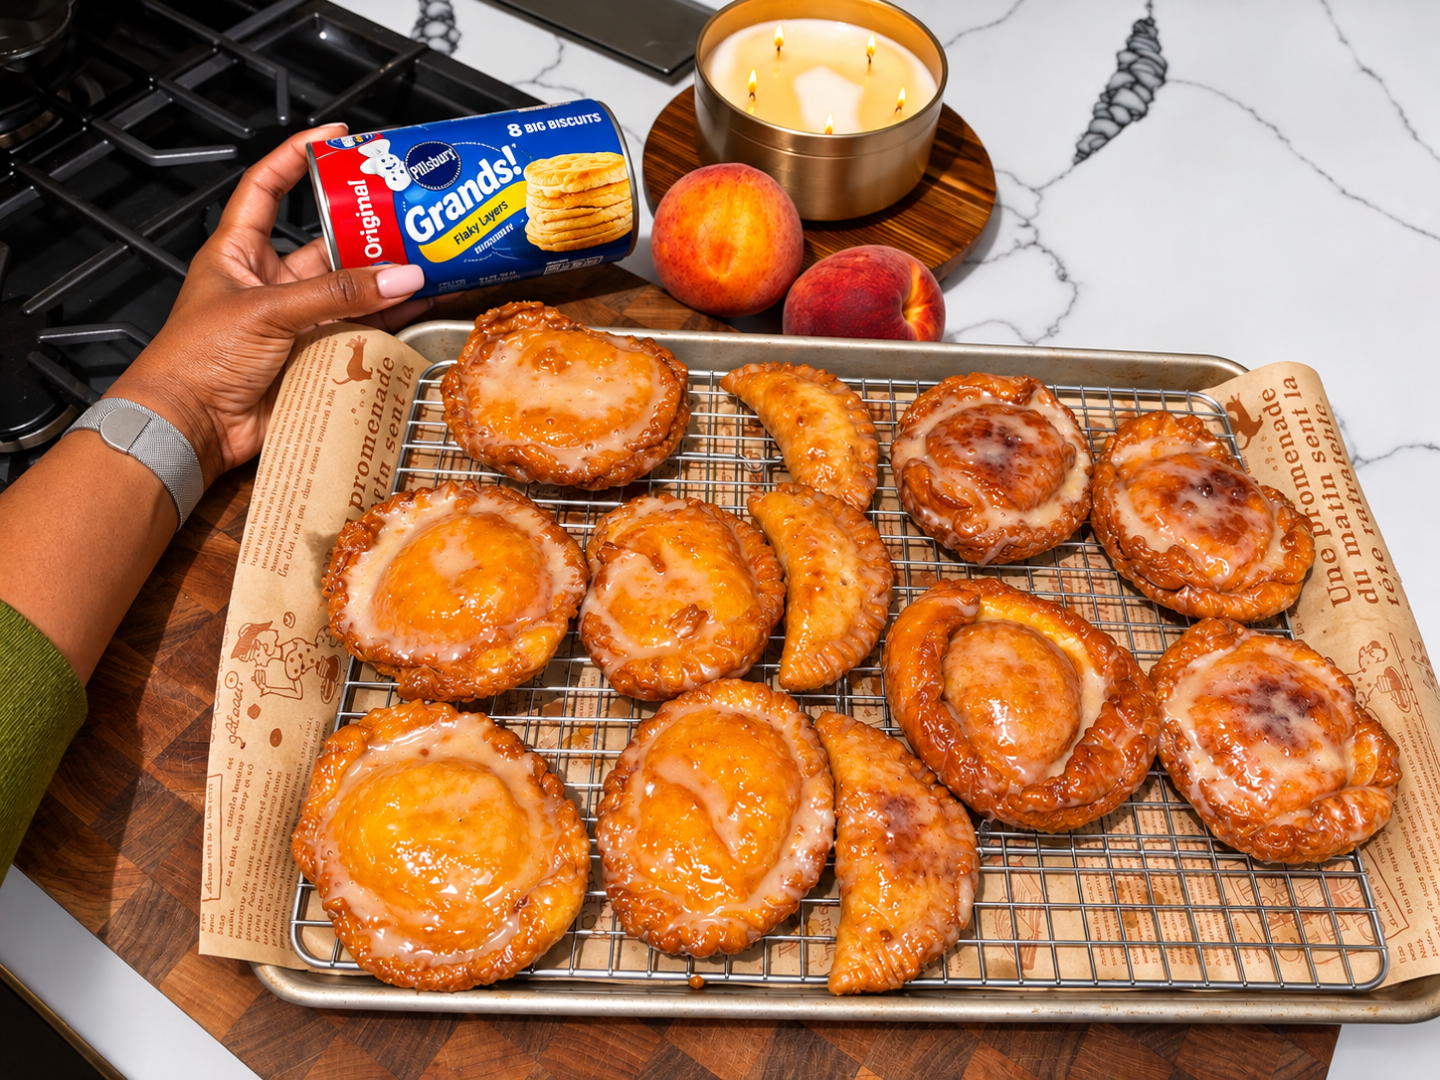
After my sweet potato hand pies went viral, y’all had one request: make them with peaches next! And you already know I had to give it a try. Apparently, apple is on the horizon too lol
These easy peach cobbler hand pies are everything I love about a classic Southern peach cobbler, wrapped up in a crispy, golden, handheld dessert. We’re talking tender, buttery peaches cooked down with brown sugar, cinnamon, vanilla bean paste, and just a touch of lemon, all tucked inside flaky biscuit dough and fried until golden brown.
But this time, I decided to switch things up.
For my original sweet potato hand pies, I used Pillsbury Grands Honey Butter Flaky Layers biscuits, and they were absolutely incredible. But when I asked my YouTube community whether I should use biscuits or traditional pie crust for this peach cobbler version, the votes were pretty much split down the middle.
So naturally, I had to test both!
And after making them side by side, I can tell you that both versions are delicious, but they deliver two completely different textures. One is crispy and crunchy, while the other is tender, buttery, and flaky.
The best part? You don’t need to make dough from scratch, and these are perfect for holiday dessert tables, Thanksgiving gatherings, or whenever you’re craving a little homemade peach cobbler without making an entire pan.
Why You’ll Love These Peach Cobbler Hand Pies
These fried peach hand pies have all the flavors of homemade peach cobbler with a fraction of the work.
- No homemade dough required. Refrigerated biscuit dough and store-bought pie crust make these surprisingly easy.
- Made with frozen or fresh peaches. You can enjoy this recipe year-round, even when peaches aren’t in season.
- Two delicious textures. Biscuit dough creates a crispy, golden exterior, while pie crust gives you a more traditional flaky pastry.
- Perfect for entertaining. They’re individually portioned, easy to serve, and ideal for holiday dessert spreads.
- That salted caramel glaze! A sweet, buttery finish that complements the spiced peach filling beautifully.
Frozen vs. Fresh Peaches: Which Should You Use?
For this recipe, I decided to use frozen sliced peaches. You can absolutely use fresh peaches, but I wanted to experiment with the texture of frozen peaches once they cooked down into a thick, syrupy filling.
The key is allowing the peaches to soften completely so you can break them into smaller, bite-sized pieces with the back of your spoon.
You don’t want huge peach chunks inside your hand pies because they make the dough harder to seal and can cause the filling to poke through.
As the peaches cook, they release their natural juices, which combine with the butter, sugar, and warm spices to create a delicious peach cobbler syrup.
A little cornstarch thickens everything into an almost jam-like consistency. This is especially important when working with delicate dough because too much liquid can cause your hand pies to leak or burst open during frying.
Biscuit Dough vs. Pie Crust: Which Is Better?
This was the ultimate experiment, and I genuinely enjoyed both versions.
Pillsbury Grands Honey Butter Flaky Layers Biscuits
The biscuit dough creates a crispy, crunchy exterior that puffs up beautifully as it fries. It almost reminds me of funnel cake, with a golden crust and tender layers underneath.
It’s the same texture that made my original sweet potato hand pies so good, and it’s still my personal favorite.
Refrigerated Pie Crust
The pie crust version is more delicate, tender, and flaky. It delivers that traditional fried pie texture, with a buttery crust that pairs beautifully with the peach filling.
These also remind me of little peach empanadas, especially when folded into half-moons.
My verdict: I prefer the crunch of the biscuit dough, but the pie crust version is still really good. For the holidays, I say make both! That way, everyone can choose their favorite.
Tips for Making the Best Fried Peach Hand Pies
Let your filling cool completely. Warm peach filling can soften the dough and make it difficult to handle. Allow the mixture to cool until thick and jam-like before assembling.
Don’t overfill your hand pies. About one tablespoon of filling is enough for each pie. If you want to add a little more, build the filling higher instead of spreading it wider. You need enough room around the edges to seal everything properly.
Make your peach pieces small. Break the softened peaches into bite-sized pieces so the filling sits comfortably inside the dough without tearing through the top.
Seal your edges twice. First press the dough together with your fingers, then crimp the edges with a fork. For the biscuit version, you can also create a decorative rope edge by gently pulling, rolling, and tucking the dough around the perimeter.
Chill before frying. Refrigerating the assembled hand pies helps the dough firm up and makes them easier to transfer into the oil.
Don’t let your oil get too hot. You want the dough to cook through while developing a beautiful golden crust. If the oil is too hot, the outside can brown before the inside is fully cooked.
Keep the hand pies moving. Turn them gently throughout frying to encourage even browning on both sides.
The Salted Caramel Glaze
For my sweet potato hand pies, I made a cinnamon glaze that was absolutely delicious. This time, I kept that same glaze recipe but swapped the cinnamon syrup for salted caramel syrup.
And let me tell you, salted caramel and peaches belong together!
The caramel adds another layer of buttery sweetness that works beautifully with the brown sugar, cinnamon, and vanilla in the peach filling.
Once the hand pies are fried and slightly cooled, dip or drizzle them with the glaze for the perfect finishing touch.
Can You Make Peach Cobbler Hand Pies Ahead of Time?
Yes! You can prepare the peach filling ahead of time and refrigerate it in an airtight container for up to three days.
When you’re ready to assemble, let the filling sit at room temperature briefly so it’s easier to scoop, but keep it cool enough that it won’t soften the dough.
You can also assemble the hand pies ahead of frying and refrigerate them on a parchment-lined tray, covered, until you’re ready to cook.
For the best texture, I recommend frying these close to serving time so you can enjoy that freshly crisp exterior.
How to Store and Reheat Leftovers
Store leftover hand pies in an airtight container in the refrigerator for up to three days.
To reheat, place them in a 325°F oven or air fryer until warmed through and the crust has crisped back up. Keep an eye on them, especially if they’ve already been glazed.
I don’t recommend microwaving them if you want to preserve that crispy texture.
Frequently Asked Questions
Can I use fresh peaches instead of frozen?
Absolutely! Fresh peaches work beautifully. Just cook them until tender and allow the juices to reduce before thickening the filling with cornstarch.
Can I use regular Pillsbury Grands biscuits?
Yes. I love the Honey Butter Flaky Layers variety for the extra buttery flavor, but other refrigerated flaky biscuit varieties should work.
Why is my peach filling too runny?
The peaches may need additional cooking time to release and reduce their juices. A small amount of cornstarch helps thicken the syrup into a jam-like filling that stays inside the dough.
Can I use empanada discs instead of pie crust?
Yes! Empanada discs are another convenient option, although the texture may be slightly different from biscuit dough or traditional pie crust.
Which dough is best for peach hand pies?
If you love a crispy, crunchy fried dessert, go with biscuit dough. If you prefer a tender, flaky pastry, use pie crust. I recommend making both for your next holiday gathering!
More Southern-Inspired Desserts You’ll Love
If you enjoyed these peach cobbler hand pies, be sure to try my Easy Sweet Potato Hand Pies, the recipe that inspired this entire experiment.
Whether you’re making these for Thanksgiving, Christmas, Sunday dinner, or just because, these easy fried peach cobbler hand pies are one of those desserts that disappear just as quickly as you make them.
And if you’re anything like me, you’ll probably end up making both versions because choosing just one is way too hard!

Easy Peach Cobbler Hand Pies
Ingredients
For the Peach Cobbler Filling
- 16 oz Frozen sliced peaches, thawed during cooking
- 1 tbsp unsalted butter
- ⅓ cup packed light brown sugar
- 1/3 cup granulated sugar
- ½ tsp ground cinnamon
- 1 tsp Cinnamon paste
- 1 tsp Vanilla bean paste
- 1/4 tsp A tiny drop of lemon extract
- ¼ teaspoon kosher salt
- Pinch of ground nutmeg
- Pinch of ground cloves, optional
- 1 tbsp Cornstarch, for thickening
For the Hand Pies
- 1 can Pillsbury Grands Honey Butter Flaky Layers Biscuits, 8-count
- 1 refrigerated pie crust, cut out 4 large circles to fold in half moons
- Neutral oil, for frying, enough to deep fry, about 2 cups
For the Salted Caramel Glaze
- 1 cup powdered sugar
- 1 tsp vanilla bean paste
- 1 tsp Salted caramel syrup, replacing the cinnamon flavoring in the original glaze (start with 1 teaspoon and adjust to taste)
- 2-3 tbsp whole milk , added gradually
Instructions
- Melt the butter in a medium saucepan over medium heat. Add the frozen peaches, brown sugar, granulated sugar, cinnamon, cinnamon paste, vanilla bean paste, lemon extract, kosher salt, nutmeg, and cloves, if using. Stir gently until the peaches begin to soften and release their juices.
- Continue cooking, stirring occasionally, until the peaches are completely thawed and tender enough to break apart with the back of a spoon. Gently break the larger pieces into small, bite-sized chunks.
- Once the peaches have released their juices and a syrup has formed, reduce the heat to low. Mix the cornstarch with a small amount of cold water to create a slurry, then stir it into the peaches. Cook briefly until the filling thickens to a glossy, jam-like consistency with very little loose liquid. Remove from the heat and allow to cool completely.
- Remove the biscuits from the refrigerator and let them sit at room temperature for a few minutes to make them easier to handle. Separate the biscuits and gently stretch each one into a slightly wider round, being careful not to tear the dough.
- Working with four biscuits for the first batch, place approximately 1 tablespoon of cooled peach filling in the center of each biscuit. Keep the filling piled toward the middle, leaving a clean border around the edges. Gently stretch the remaining four biscuits and place one over each filled biscuit.
- Press the edges together firmly with your fingers, then crimp with a fork to seal. For a decorative rope edge, gently pull, roll, and tuck small sections of dough around the perimeter until completely sealed.
- Transfer the assembled biscuit hand pies to a parchment-lined tray and refrigerate while preparing the pie crust version.
- Unroll the refrigerated pie crust onto a lightly floured surface. Cut into rounds large enough to hold approximately 1 tablespoon of peach filling while leaving room to seal. Gather and reroll the scraps as needed.
- Spoon the cooled filling onto one half of each round, keeping it away from the edges. Fold the dough over to create a half-moon shape, gently push the filling toward the center, and press the edges together. Crimp with a fork to seal completely. Refrigerate until ready to fry.
- Pour approximately 2 inches of neutral oil into a heavy-bottomed skillet or Dutch oven and heat to about 325°F. Working in batches, carefully lower the biscuit hand pies into the hot oil without overcrowding the pan.
- Fry for approximately 4 minutes total, turning after the first 60 seconds and continuing to flip as needed until the pies are puffed, evenly golden brown, and cooked through. Adjust the heat as necessary to prevent the exterior from browning too quickly. Transfer to a wire rack to drain.
- Fry the pie crust hand pies in batches, turning after approximately 60 seconds and continuing until both sides are golden brown and the pastry is cooked through. These may require fewer turns than the biscuit version. Transfer to a wire rack.
- To prepare the glaze, whisk together the powdered sugar, vanilla bean paste, and salted caramel syrup in a medium bowl. Add the milk gradually, one tablespoon at a time, until the glaze is smooth and thick enough to coat the hand pies without running off completely.
- Allow the fried hand pies to cool slightly, then dip the tops into the salted caramel glaze or drizzle it generously over each pie. Let the glaze set briefly before serving.
Notes
Nutrition information is automatically calculated, so should only be used as an approximation.