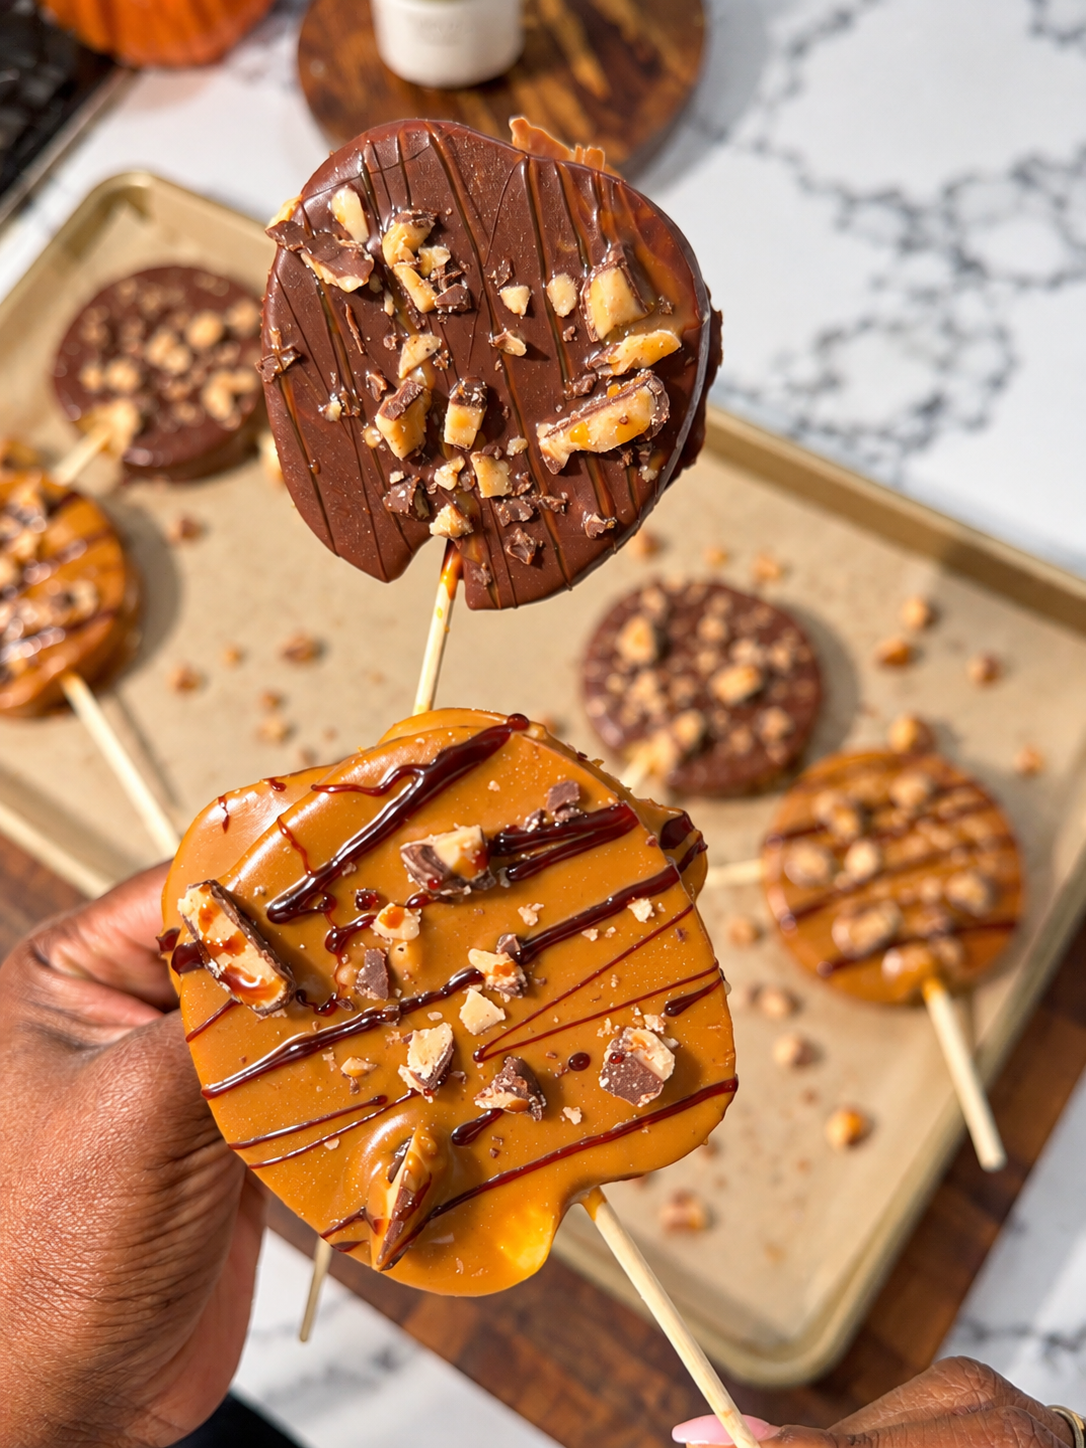
Turns out, candy apples are way more fun to look at than they are to actually eat. And this viral candy apple hack might be the easiest way to fix that.
Inspired by the viral candy and caramel apple hack from Crowded Kitchen and many other creators, we’re skipping the messy whole apples and turning them into individual candy apple pops instead. Think thick, crisp Pink Lady apple slices on a stick, coated in creamy Biscoff cookie butter, rich semi-sweet chocolate, crunchy Heath toffee, and a drizzle of caramel.
The beauty of this easy candy apple hack is that you get all the flavors of a traditional candy apple without struggling to take that first bite. Plus, the topping combinations are endless, making these chocolate covered apple slices perfect for Halloween parties, fall gatherings, or an easy sweet treat at home.
And the best part? No baking, no complicated candy-making, and just 30 minutes in the freezer until they’re ready to enjoy.
Why You’ll Love These Chocolate Covered Apple Slices
- Easier to eat than traditional candy apples. No struggling to bite into a whole apple or crack through a thick candy shell.
- No baking required. All you need to do is slice, dip, decorate, and chill.
- Easy to customize. Mix and match cookie butter, chocolate, caramel, toffee, crushed cookies, or your favorite toppings.
- Perfect for entertaining. These individual apple pops are easy to serve at fall gatherings, Halloween parties, and dessert tables.
- A delicious combination of textures. Crisp, juicy apples, smooth cookie butter, rich chocolate, and crunchy toffee in every bite.
Ingredients You’ll Need
Makes approximately 10–12 apple slices, depending on apple size and thickness. Quantities below are suggested starting amounts.
- 3 large Pink Lady apples
- ¾ cup Biscoff creamy cookie butter
- 1 cup semi-sweet chocolate chips
- 1–2 teaspoons coconut oil, optional, for thinning the chocolate
- ½ cup chopped Heath toffee bits
- 2–3 tablespoons caramel sauce, for drizzling
- 2–3 tablespoons date syrup, for drizzling
- 10–12 food-safe popsicle sticks
Why Pink Lady Apples?
Pink Lady apples are one of my favorite varieties for this recipe because they’re naturally sweet, slightly tart, and have a crisp, firm texture that holds up well when sliced.
That little bit of tartness also helps balance the sweetness of the Biscoff cookie butter, chocolate, and caramel.
If you can’t find Pink Lady apples, Honeycrisp, Granny Smith, or Fuji apples are great alternatives. Granny Smith is especially delicious if you prefer a more tart contrast to the sweet toppings.
How to Make Chocolate Covered Apple Slices
1. Wash and thoroughly dry the apples. Using a sharp knife, slice each apple vertically into thick rounds, approximately ½ to ¾ inch thick. Remove any visible seeds or tough pieces of the core.
2. Carefully insert a popsicle stick into the bottom of each apple slice, creating a handheld apple pop. If needed, use the tip of a small knife to create a starter opening for the stick.
3. Pat the exposed surfaces of each apple slice dry with a paper towel. Removing excess moisture helps the cookie butter and chocolate adhere.
4. Add the Biscoff cookie butter to a microwave-safe bowl and heat in 10–15 second intervals, stirring between each interval, until smooth and easy to spread. You want it slightly loosened, not hot.
5. Melt the semi-sweet chocolate chips in a separate microwave-safe bowl in 20-second intervals, stirring until smooth. Add a little coconut oil if needed for a thinner consistency.
6. Spread or dip the apple slices in the creamy Biscoff cookie butter, coating both sides as desired. For the chocolate version, allow the cookie butter to firm up briefly before adding a layer of melted semi-sweet chocolate.
7. While the coating is still soft, sprinkle the apple slices with chopped Heath toffee bits. Finish with a drizzle of caramel sauce.
8. For a second variation, skip the chocolate and coat the apples in Biscoff cookie butter only. Top with Heath toffee bits and a drizzle of date syrup.
9. Arrange the decorated apple slices in a single layer on a parchment-lined baking sheet. Transfer to the freezer for approximately 30 minutes, or until the coatings are firm.
10. Remove from the freezer and enjoy! If the apples are very cold or firm, let them sit for a few minutes before serving.
My Favorite Flavor Combinations
One of the things I love most about these chocolate covered apple pops is how easy they are to customize. You can keep things simple or load them up with all your favorite toppings.
Biscoff Chocolate Toffee Apple Slices
This is the ultimate indulgent combination. Creamy Biscoff cookie butter, rich semi-sweet chocolate, crunchy Heath toffee, and a drizzle of caramel. It’s sweet, buttery, chocolatey, and perfectly balanced by the crisp apple underneath.
Biscoff Toffee Apple Slices with Date Syrup
If you love cookie butter, this version is for you. Skip the chocolate and let the creamy Biscoff flavor shine. Finish with chopped Heath toffee and a drizzle of date syrup for a sweet, caramel-like finish.
More Topping Ideas
Try crushed Biscoff cookies, mini chocolate chips, chopped pecans, crushed pretzels, white chocolate drizzle, or flaky sea salt. You can even set up a little apple pop decorating station and let everyone create their own combination.
Tips for the Best Chocolate Covered Apple Slices
Dry your apples really well. This is probably the most important step. Chocolate and cookie butter don’t adhere as easily to wet apple surfaces, so pat the slices dry before adding your coatings.
Slice your apples thick enough. Aim for approximately ½ to ¾ inch slices. Thin slices can break when you insert the popsicle sticks or add heavier toppings.
Don’t overheat the cookie butter. You only need to warm it enough to make it spreadable. If it becomes too thin, it may slide right off the apple.
Work in layers. If you’re combining cookie butter and chocolate, let the first layer firm up briefly before adding the second. This helps keep the coatings from mixing together.
Add toppings before the chocolate sets. Sprinkle the Heath toffee bits on while the coating is still soft so they stick.
How to Store Chocolate Covered Apple Slices
These apple pops are best enjoyed the same day they’re made, when the apples are crisp and the toppings are freshly set.
If you’re preparing them ahead of time, store the finished slices in a single layer in an airtight container in the refrigerator. For the best texture and appearance, I recommend enjoying them within 24 hours.
Because the apples are sliced, they can release moisture and gradually brown, especially where the fruit is exposed. The chocolate coating may also develop condensation after refrigeration.
You can freeze the apple slices for 30 minutes to set the toppings, but I don’t recommend storing them in the freezer long-term. Once thawed, the apples may become soft or watery.
Frequently Asked Questions
What are the best apples for chocolate covered apple slices?
Firm, crisp apples work best. Pink Lady, Honeycrisp, Granny Smith, and Fuji are all excellent choices. I prefer Pink Lady because they’re sweet with just enough tartness to balance the rich toppings.
How do you keep chocolate from sliding off apple slices?
The key is removing as much surface moisture as possible. Thoroughly dry the apples after washing, and pat the freshly cut surfaces with paper towels before coating. Letting each layer firm up before adding another also helps.
Can I make chocolate covered apple slices ahead of time?
Yes, but they’re best made close to serving time. You can prepare them a few hours ahead and refrigerate until ready to serve. For the best results, enjoy them within 24 hours.
Can I use caramel instead of Biscoff cookie butter?
Absolutely! You can use a thick caramel coating, melted chocolate, or cookie butter as your base. Just make sure the consistency is thick enough to cling to the apples.
How long do chocolate covered apple slices need to set?
Approximately 30 minutes in the freezer should be enough for the coatings to firm up, depending on their thickness. You can also let them set in the refrigerator, although that may take longer.
Do I need to peel the apples first?
No! Leave the skin on. It helps the slices hold their shape, adds color, and provides a nice contrast to the sweet toppings.
The Perfect Easy Fall Treat
If you love traditional candy apples but could do without the mess, these Biscoff Chocolate Covered Apple Slices are such a fun alternative. You still get that delicious combination of crisp apples and sweet toppings, just in a much easier-to-eat version.
Between the creamy cookie butter, melted chocolate, crunchy Heath toffee, and caramel drizzle, these little apple pops are hard to resist.
Make a batch for your next fall gathering, get the kids involved in decorating, or keep things simple with your favorite toppings. Either way, I have a feeling you’ll be making candy apples this way from now on.

Chocolate Covered Apple Slices with Biscoff Cookie Butter and Toffee
Ingredients
- 3 large Pink Lady apples
- ¾ cup Biscoff creamy cookie butter
- 1 cup semi-sweet chocolate chips
- 1 –2 teaspoons coconut oil, optional, for thinning the chocolate
- ½ cup chopped Heath toffee bits
- 2 –3 tablespoons caramel sauce, for drizzling
- 2 –3 tablespoons date syrup, for drizzling
- 10 –12 food-safe popsicle sticks
Instructions
- Wash and thoroughly dry the apples. Using a sharp knife, slice each apple vertically into thick rounds, approximately ½ to ¾ inch thick. Remove any visible seeds or tough pieces of the core.
- Carefully insert a popsicle stick into the bottom of each apple slice, creating a handheld apple pop. If needed, use the tip of a small knife to create a starter opening for the stick.
- Pat the exposed surfaces of each apple slice dry with a paper towel. Removing excess moisture helps the cookie butter and chocolate adhere.
- Add the Biscoff cookie butter to a microwave-safe bowl and heat in 10–15 second intervals, stirring between each interval, until smooth and easy to spread. You want it slightly loosened, not hot.
- Melt the semi-sweet chocolate chips in a separate microwave-safe bowl in 20-second intervals, stirring until smooth. Add a little coconut oil if needed for a thinner consistency.
- Spread or dip the apple slices in the creamy Biscoff cookie butter, coating both sides as desired. For the chocolate version, allow the cookie butter to firm up briefly before adding a layer of melted semi-sweet chocolate.
- While the coating is still soft, sprinkle the apple slices with chopped Heath toffee bits. Finish with a drizzle of caramel sauce.
- For a second variation, skip the chocolate and coat the apples in Biscoff cookie butter only. Top with Heath toffee bits and a drizzle of date syrup.
- Arrange the decorated apple slices in a single layer on a parchment-lined baking sheet. Transfer to the freezer for approximately 30 minutes, or until the coatings are firm.
- Remove from the freezer and enjoy! If the apples are very cold or firm, let them sit for a few minutes before serving.
Nutrition information is automatically calculated, so should only be used as an approximation.